Command & Conquer: Generals/Debug Tools
This is a sub-page of Command & Conquer: Generals.
To use the debug tools, you need two files, DebugWindow.dll and ParticleEditor.dll. You can get these, for example, from the prototype game. Once you have these files, open a command-line window and start generals.exe with the parameters -win (it only works in windowed mode, not full-screen mode) and either one of the two parameters, depending on which debug tool you want to use:
Script debugger
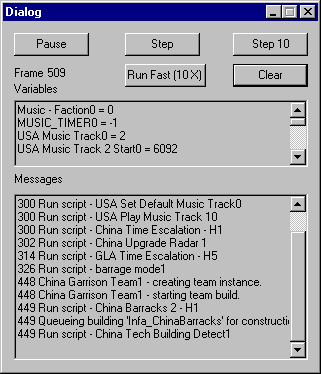
To use the script debugger, run the game with the -scriptDebug parameter. The script debugger allows you to analyze the game scripts. These include mission scripts, AI scripts and the game music.
The interface is easy to understand. The Variables window shows all variables defined at run-time, with their contents. The Messages window is used by the game to report what the scripts were doing at a certain frame. There's also a frame counter which counts all the frames that have already elapsed. Note that the script debugger slows down the game a lot.
There are five buttons you can use.
- Pause halts the game completely. This allows you to look at the game world, and analyze the variables and messages logs.
- Step advances the game one frame.
- Step 10 advances the game ten frames.
- Run Fast (10X) makes the game run at 10x the normal speed. Since most computers are too slow to keep up with this speed, it will in almost all cases simply lead to frameskip.
- Clear clears the variables and messages logs.
Particle editor
To use the particle editor, run the game with the -particleEdit parameter. The particle editor allows you to edit the particles in the game, preview them, and save them to a temporary file so you can add them to the game code. Note that the particle editor does not work correctly in the expansion pack - it still appears but only outputs garbage values. This may be because the underlying code was removed from the expansion pack for optimization purposes.
Completely contrary to the script debugger, the particle editor uses a very complex interface. This is due to the many possible options for particle systems in this game. However, it still does not allow all possible options, probably due to its age.
- Particle Cap allows you to adjust the current Particle Cap in-game. You can raise it if you need to test a particle system that generates many particles, or you can lower it to see how your particle systems behave when the cap has been reached.
- Current Count shows the current amount of particles in the game world.
- System allows you to select the particle system you want to edit. You can also choose to create a completely new particle system.
- Go generates the particle system. This allows you to check how it looks like.
- Parent is used if the particle system is a slave of a parent particle system. If this is true, the parent particle system can be selected here.
The next part, System Parameters, has many options for editing the actual particle system. In the first section, the following changes can be performed:
- Emission Type changes the space in which the particles will originate. There are five options, and depending on which one you choose, additional options will appear in the Emission ??? Properties section.
- POINT means that all particles will spawn at one point. No additional options appear for this option.
- LINE means that the particles will generate anywhere along the specified line. Additional options allow you to set the start and end points of the line. If both the start and end points are identical, the result will be identical to POINT.
- BOX means that the particles will generate in a box. Additional options allow you to specify the size of the box.
- SPHERE means that the particles will generate in a sphere. An additional option allows you to set the radius of the sphere.
- CYLINDER means that the particles will generate in a cylinder. Additional options allow you to specify the radius and the length of the cylinder. If the length is zero, it will work like a circle.
- Velocity Type specifies how the particles move when they are generated. There are five options, and depending on which one you choose, additional options will appear in the ??? Velocity Properties section.
- ORTHO means that the particles will move into a specific direction. Additional options allow you to specify how fast the particles will move to each axis.
- SPHERICAL means that the particles will form a sphere when moving. Additional options allow you to specify how fast the particles will move.
- HEMISPHERICAL means that the particles will form a half sphere. Additional options allow you to specify how fast the particles will move.
- CYLINDRICAL means that the particles will form a cylinder when moving. Additional options allow you to specify how fast the particles will move radially and orthogonally.
- OUTWARD means that the particles will simply be thrown outward. Additional options allow you to specify how fast the particles move along the major and minor axis.
- Particle Type specifies the type of particle. There are only two possible options.
- PARTICLE should almost always be used. It specifies that this particle system uses a texture for drawing the particle. In the 2-D Particle Parameters section you can specify which texture should be used for drawing the particle.
- DRAWABLE means that the particle system uses an object from the game, rather than a texture, for drawing the particle. In the 3-D Particle Parameters section you can specify which object should be used for drawing the particle.
- Shader Type specifies the shader to use for the particle texture. This option is completely irrelevant if the particle type is DRAWABLE.
- ADDITIVE is used for complex additive shaders. However, the texture needs to have the appropriate channels.
- ALPHA means that the particle has an alpha channel for transparency.
- ALPHA_TEST should be used if you just want simple transparency.
- MULTIPLY
To do:
Do something about it.
- Angle allows you to specify the angle the particle will face initially. Generally, only the Z axis should be used.
- Angular Rate specifies how fast the particle will rotate. Again, only the Z axis should be used.
- Gravity specifies the gravity applied to the particle system. If it is negative, the particles will be pulled downward, if it is positive, they will be pulled upward. If it is zero, the particle system will be unaffected by gravity.
- One Shot specifies if the particle system will generate the particles only once, or indefinitely.
- Hollow specifies where the particles will generate. If checked, the particles will only generate at the edge of their volume (compare the Emission Type), creating a hollow effect.
Clicking on the Colors/Alpha button opens another window. This is a very important window, since it allows you to color the particles and add transparency.
The Color Keyframes section allows you to set the color the particle should assume during its lifetime. If you click on the black box, the standard Windows color dialog pops up allowing you to select the appropriate color. The color you selected will then appear in the box. In the Frame field, you enter the frame the particle should change its color in. There are eight fields, allowing you to change the color up to eight times.
The Alpha Keyframes section allows you to set the alpha transparency of the particle. The Min and Max fields allow you to set the transparency (1 is opaque, 0 is fully transparent). The Frame field, again, allows you to set the frame the particle should assume the transparency in. Again there are eight fields available to you.
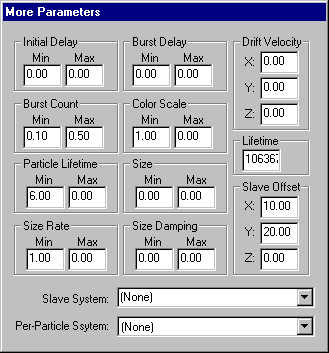
Clicking on the Continued... button opens another window with some additional options to finetune the particle system.
- Initial Delay sets the delay in frames that must pass before the particle system generates any particles.
- Burst Delay sets the delay between bursts of particles.
- Burst Count sets the amount of particles that should be generated at each burst.
- Color Scale scales all the colors. This allows you to make the entire particle system darker or brighter, without having to change the individual colors. Negative numbers darken the particle system while positive numbers brighten it.
- Particle Lifetime sets the lifetime of each individual particle in frames. After this lifetime, the particle will die.
- Size sets the size of the particles.
- Size Rate sets how quickly the particle system should change its size, i.e. become larger or smaller.
- Size Damping allows you to change the size rate above over time.
- Drift Velocity sets how fast the particle should move away from map coordinates 0,0,0 (i.e. towards the top right corner) for each axis.
- Lifetime is the total lifetime of the particle system. Note that the initial delay does count towards the lifetime, therefore the lifetime should always be larger than the initial delay, otherwise the particle system will not do anything.
The Slave System field allows this particle system to spawn another particle system. Using the drop-down, you can select the particle system to be spawned. Using the Slave Offset fields you can set the position the slave system should generate, relative to the position of the parent particle system.
The Per-Particle Ssytem (sic!) does the same, but for each individual particle, rather than just for the entire particle system.
In the File drop-down menu you can find the following options:
- Reload Current reloads the particle system you have just edited.
- Reload All reloads all particle systems you have edited.
- Save Current saves the particle system you have edited. It will end up in a file called temporary.ini in the game's root directory with the finished code, from where you can move the particle system to the game code.
- Save All saves all particle systems you have edited.
Other debug text
Inside the executable, more debug text can be found:
* Times are in Game Seconds which are based off of frames. Current fps is set to %d

#AIU = # of AI's Units
#PU = # of Player's Units
$$$ = Local Player's Cash Amount
OC = Other Commands (N/A)
ST* = Scroll Time in Seconds
SMC = Scroll Map Commands
AC = Attack Commands
MC = Move Commands
BC = Build Commands
Time* = The Time Interval
=KEY===============================================
End Time:	%s
---------------------------------------------------
%s%s%s.txt  _%b%d_%I%M%p Time*	BC	MC	AC	SMC	ST*	OC	$$$	#PU	#AIU
---------------------------------------------------

Side:	%s
Map:	%s
Date:	%s
** WARNING: The variation among the individual results is too large
** WARNING: The current test result is NOT 95 % statistically certain
* = thumbnail used
percent    = savings of reduction system, in percents
(w/o red)     = size of reduction not used
size          = amount of memory needed for texture
red         = texture reduction factor
changes    = # of times texture change needed - BAD IF HIGH!
refs          = # of times texture is used when rendering
id              = id of texture. Use with command 'flash_texture [id]'


