Prerelease:The Legend of Zelda
This page details prerelease information and/or media for The Legend of Zelda.
| To do: There's more info out there. Add sources for some of the screenshots. Reorganize if needed. |
Contents
Story
It was my first video game-related job. At the time it was titled Death Mountain. I wrote a story that was inspired by conflicts of hegemony that happened in medieval Europe and created the legend of the Triforce. A system where you collect the scattered pieces of an item is nothing special nowadays, but back then it was pretty novel. I was quite proud of that.
— Scriptwriter Keiji Terui
Title Screen Music
In an interview with Electronic Gaming Monthly that published in EGM Issue #198, Koji Kondo explains that the original title theme was supposed to be a cover of "Bolero". However, he was informed at the last minute that the song was not yet in the public domain, so he had to create his own theme:
Electronic Gaming Monthly: This is an open-ended question, but do you have any stories or funny anecdotes that you remember from the early days, maybe the early Famicom days, about your music or the games?
Koji Kondo: Yes, as I recall, in the very first The Legend of Zelda, in the very opening title screen, we used to use the classical music of "Bolero," because that tempo was perfectly matched with the speed of the opening screen rolling. But I remember it was just before, when we really had to complete the final ROM for reproduction, they told me that unfortunately the copyright of that music hadn't expired yet, so I had to compose a completely new piece of music that [sic] night. I recall that I did it within one day. You know, "da-da-da-da" — that was done in just in one night.
Electronic Gaming Monthly: You came up with that and recorded it in just one day?
Koji Kondo: Yeah, but of course, we already had the ground level music [overworld theme] figured out, so what I did was just an arrangement to perfectly match with the opening scroll.
Iwata Asks
As an additional volume included with the The Legend of Zelda: Spirit Tracks Iwata Asks interview, the staff unveil the history of prior handheld titles in the Zelda series.
Early CHR Layout
Below is an early development document by Shigeru Miyamoto, which shows where various sprites would be stored in the CHR data. This would later appear in the Hyrule Historia.
- The document seems to have been made before the game's sprite size was finalized, as several sprites occupy a single 8×8-pixel tile. The final game uses 8×16 sprites, which occupy two consecutive tiles regardless of the sprite's actual size.
- Several different designs for the clock item are seen on the right: a grandfather clock, an alarm clock, and the final stopwatch.
- On rows 6 and 7, there seems to be a cockroach-like enemy that never made it into the game.
- Rows 8 and 9 have sprites modeled after haniwa and doguu, two types of ancient Japanese clay figures.
- On rows A and B and columns A and B, there seems to be a Wizzrobe-like enemy, but with just one eye.
- At 2F, right above the meat, there is an unknown graphic that resembles half of a sandwich.
- 28 and 38 contain a tunic, which is nowhere to be seen in the final game.
- On rows C and D, there is an ox-like enemy that never made it into the game.
Second Quest Origin
According to the Iwata Asks interview, the game was originally meant to have only one quest (some lines removed for clarity):
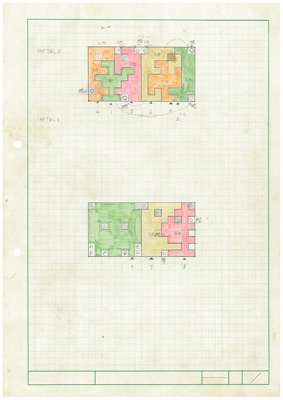
Nakago: And I've got something even more interesting today. This is the first dungeon map ever created for The Legend of Zelda.
Tezuka: Basically, we were going to make lots of dungeons using one square per room, and lay them out like a jigsaw puzzle.
Iwata: In order to fit in as many dungeons as possible given the limited memory, you were making them like you were doing a puzzle.
Nakago: Right. Tezuka-san said, "I did it!" and brought this to me. I created the data exactly in line with it, but then Tezuka-san made a mistake and only used half of the data.
I said, "Tezuka-san, there's only half here. Where did the other half go?" and he was like, "What?! Oops, I messed up..." But Miyamoto-san said it was fine just like that.
Nakago: So, using the half of the memory that was left over, we decided to create the Second Quest.
Iwata: Huh? Just wait a second. If Tezuka-san hadn't messed up, there'd have been no Second Quest?
Nakago: Yes, that's right.
Nakago: [...]And this is the original for the Second Quest.
Iwata: So this is the Second Quest resulting from Tezuka-san's mistake...
Iwata: Was it Miyamoto-san who suggested turning this into a second quest?
Nakago: Yeah, it was.
Famimaga Issue 7
The February 1986 issue of Family Computer Magazine (aka Famimaga) included a preview of the game. This issue had a focus on items.
Screenshots
| Early | Final |
|---|---|
 |
 |
- The English letters/numbers use the thicker font that would later be used in the NES and Famicom cartridge versions, albeit with a different I and R.
- The bomb counter is missing.
- Despite having the Lion Key in the inventory, the key counter is still a numerical value. The final version changes this to "A" once the key is obtained.
- The Triforce is referred to in English as the "POWER TRIANGLE", which was changed to "トライフォース" ("Triforce").
- The "夕" character may be slightly different.
| Early | Final |
|---|---|
 |
 |
Several bushes were cleared out of this section of the overworld, removing a chokepoint that could potentially cause problems for beginning players.
| Early | Final |
|---|---|
 |
A closeup crop of this screenshot (mirrored in the magazine) shows the detail of Link's sprite. He has extra pixels of hair in the back, giving the appearance of a mullet (something noticeably missing in other screenshots). The sword sprite is also placed one pixel higher.
| Early | Final |
|---|---|
 |
 |
- This mountain region below the second dungeon was recolored from brown to green.
- Link is shown performing a fully extended sword stab while in a standing position, something not possible in the final.
- Link doesn't seem to have a shield.
| Early | Final |
|---|---|
 |
 |
- This room of the Moon dungeon was seemingly relocated.
- The blocks have a much more elaborate design.
- The key drop point was re-centered.
- The dungeons were originally referred to by their names (in this case "MOON") rather than just "LEVEL-#".
- The map is made up of squares instead of rectangles. Whether this meant that dungeons were double their final size in this build isn't known for sure, as the original planning sheets seen above features the dungeons with their final grid sizes.
- Link still doesn't have a shield.
Items
| Early | Final |
|---|---|
The stepladder looks completely different, appearing to be a simple square with a checkerboard pattern. It may be a placeholder, or a different kind of object entirely, though the magazine still refers to it as a "ladder".
| Early | Final |
|---|---|
The magical rod is red instead of blue.
| Early | Final |
|---|---|
The food appears more square, with differently positioned spots.
Famimaga Issue 8
The March 1986 issue of Famimaga followed up with another preview of the game; this one with a focus on enemies. The build shown is newer than the one in the previous issue, but still not quite final.
Finalizations
These things seem to have been finalized between the build shown in the last issue and this one.
- Link's sprite
- The bomb counter in the HUD
- The inventory screen
- The sprites for the stepladder, magical rod, and food
Screenshots
| Early | Final |
|---|---|
 |
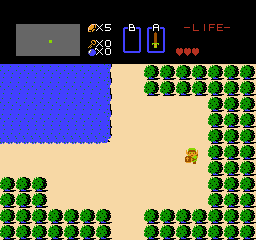 |
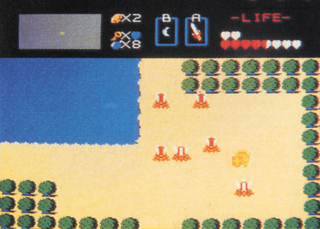
The game's font is now nearly identical to the final FDS version, with the only difference being that the I has serifs.
Two extra columns of bushes were added to the right side of this screen.
A blue heart is shown in the key counter, presumably due to the magical key being obtained. The final game uses an "A" (for "Almighty") instead.
| Early | Final |
|---|---|
 |
 |
An extra bush was added near the left entrance of this screen. (One of them can be burned to reveal a secret entrance in the final game.)
| Early | Final |
|---|---|
 |
 |
This entrance to "LEVEL-1" is actually the Moon dungeon that was shown in the last issue. If you look closely, you can see the distinct shape of the dungeon's map which was inked out. The finalized dungeon naming scheme was implemented, however, the Moon dungeon is actually Level 2 in the final game.
Additionally, the pixels between the floor tiles are red in the magazine screenshot.
Enemy Sprites
| Scan | Mock-Up | Final |
|---|---|---|
The Stalfos is much simpler, with a less elaborate design for its face and its two swords. It also uses a blue palette, as opposed to a red one, which is even reflected in its promotional artwork. Interestingly, the Stalfos seen in the "ZEL-B" prototype, while essentially finalized, features a different raised foot, whereas the final sprite coincidentally looks more like the early one seen here.
| Scan | Mock-Up | Final |
|---|---|---|
The Wallmaster has a some rather sloppy extra pixels which were removed in the final game. Its spots (boils?) are also more numerous, more grouped together, and contain dark blue ones as opposed to just white ones. Interestingly, the ZEL-B prototype features what is essentially the final sprite, minus the spots. This would either imply that the devs were considering removing the spots, or that the ZEL-B sprite was just in the middle of being reworked.
| Scan | Mock-Up | Final |
|---|---|---|
The Keese is slightly thinner, has no legs, and appears to have smaller eyes.
| Scan | Mock-Up | Final |
|---|---|---|
The Rope is quite noticeably different. Namely, it looks much more like a realistic cobra, with a complex pattern on its hood, no gaping maw, and a smooth underbelly instead of a striped one. It is also assigned a blue palette instead of a red one, which is once again reflected in its promotional artwork.
| Scan | Mock-Up | Final |
|---|---|---|
Gleeok's Head originally had a completely different design, which is odd since the regular Gleeok shown in this magazine uses its final design. Here, the head is much rounder, and looks more like some sort of ogre than a dragon. Moreover, its main two colors are swapped, with the head being orange and the fire red, instead of it being the other way around.
| Scan | Mock-Up | Final |
|---|---|---|
The Darknut's shield was originally plainer and wider, its belt buckle is less visible, its sword is thinner, and its shoulder pad red instead of white.
| Scan | Mock-Up | Final |
|---|---|---|
Pols Voice originally lacked whiskers, which is interesting as its promotional artwork actually does have them. This could then mean that the sprite used here is from an earlier build, which predates the artwork, or that the devs liked the artwork's interpretation of this enemy and then added the whiskers later. Also worth noting is how Pols Voice has brown eyes here, but in the ZEL-B prototype they are assigned Link's tunic color, a trick which in the final game was assigned to its whiskers, the eyes being reverted to brown.
| Scan | Mock-Up | Final |
|---|---|---|
The Boulder sprite was originally quite sloppier, lacking white highlights and looking more like a giant walnut. This sprite actually managed to stick around for quite a bit, with it still being around by the time of the ZEL-B prototype.
| Scan | Mock-Up | Final |
|---|---|---|
The Ghini originally had two legs, as well as a meaner expression, making it look like a ghastly starfish. This sprite is also still present in the ZEL-B prototype, and this early design was also used for this enemy's artwork in the Japanese strategy guide.
| Scan | Mock-Up | Final |
|---|---|---|
Interestingly, the magazine uses not one, but two iterations of the Rope enemy, which all but confirms that not all of the sprites used here come from the same build. This sprite is essentially identical to final, with only the face's perspective being different, and with the underbelly being less jagged.
FDS Promotional Video
Early footage of the game appeared in a 12 minute long promotional video for the Famicom Disk System.
| Pre-release | Final |
|---|---|
 |
 |
| Pre-release | Final |
|---|---|
 |
 |
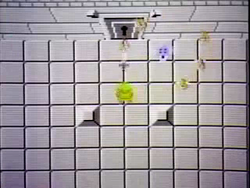
The dungeon blocks from the Famimaga screenshots are shown in the video, although other footage shows a design much closer to the final version but with different shading.
Aquamentus' sprite is noticeably different, with a less detailed eye. Most of the white and dark green colors were reversed on the final sprite. In addition, the room he's faced in is using the Levels 4 and 6 palette as opposed to the final's Level 1 palette.
| Pre-release | Final |
|---|---|
 |
 |
In this image, the old man in the first cave gives Link the option between a sword and a boomerang. The old man's message is different as well. Instead of saying "It's dangerous to go alone. You may have this." he says "It's dangerous to go alone. Take whichever weapon you prefer."
The layout of the cave also differs - the old man and the flames are not aligned centrally within the room, and the flames are placed one block closer to him on each side.
Interestingly, this image also appears on page 41 of the NES version's manual, but with the Japanese text blacked out.
| Pre-release | Final |
|---|---|
 |
 |
- Some rocks and Tektites were removed.
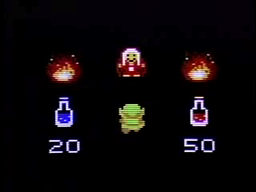
No shop in the final game matches this shop's cheap prices. In the final game, the prices are 40 for the blue potion and 68 for the red potion. This was likely changed due to two blue potions being cheaper than one red potion, thus making red potions rather pointless.
| Pre-release | Final |
|---|---|
 |
 |
- The prices in this shop are cheaper in this pre-release image and the inventory is a bit different as well.
- As with the old man's cave above, the layout of the cave differs - the shopkeeper, flames and items aren't aligned centrally, and the flames are placed one block closer to the shopkeeper on each side.

