Proto:Super Mario World 2: Yoshi's Island/ystool.hex
This is a sub-page of Proto:Super Mario World 2: Yoshi's Island.
This version of the editor, the oldest, is found in the SFC\ソースデータ\ヨッシーアイランド\ツール\tool\old_cos ("old course") directory, specifically in the sfc folder. old_cos includes various files pertaining to it, which, together with the ROM, provide a snapshot of the game's development in late 1993, approximately 1.5 years before its June 1995 release.
Contents
Editor
Overview
No header fix is required to boot this level editor. an emulator with SFX-DOS support is required, such as this branch of bsnes-plus. The mouse should be configured to be in Controller Slot 2.
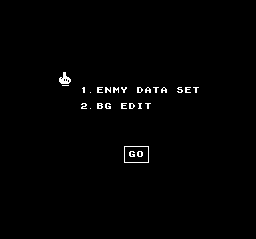
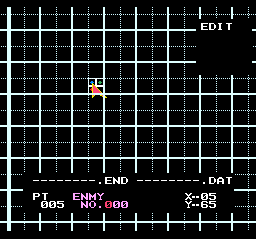
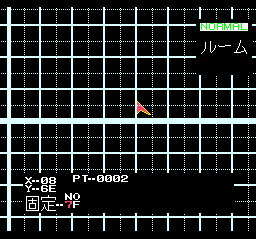
Upon boot, there are two choices: ENMY DATA SET and BG EDIT. The first allows for placement of enemies on the map, and the second choice allows for editing of map tiles.
No one has figured out how to fully utilize the editor yet, as the instructions in the README below suggest that the keyboard's function buttons need to be used in order to load .DAT files, and BSNES Plus doesn't appear to respond to function button input. A possible solution would be to remap the function buttons to other keys by editing the ROM.
| Main Menu | ENMY DATA SET | BG EDIT |
|---|---|---|
Instructions
A set of instructions for using the editor can be found in ツール\tool\old_cos\doc\nii.doc, which is named for programmer Masaru Nii.
| Japanese | English |
|---|---|
**************************** * ヨッシーBGツール(ver1.1)使用説明書 * **************************** <マウスのボタン説明> キー名 キーの説明 右ボタン 可変ユニットをセットする時に、始点/終点カーソルを切り換える 左ボタン ユニットをセットする <キーボードの説明> ***ファンクションキーの説明*** キー名 キーの説明 = f1キー 作業モード変更(ノーマル、デリート、サーチデリート等) f2キー フロッピーのフォーマット f3キー ファイルのセーブ f4キー ファイルのロード f5キー フロッピー内のファイルのデリート f6キー 画面使用状況一覧 f7キー 各種パラメータの設定 f8キー 左に一画面スクロール f9キー 右に一画面スクロール f10キー ゲーム中に使用される全てのBG(遠景、近景)を表示する ファンクション処理に入って、そのファンクションに対応しているファンクションキーを押すと、通常の処理に戻れる また、作業モード変更処理中はreturnキーを押しても、通常の処理に戻れる ***その他のキーの説明*** キー名 キーの説明 roll up キー 上に一画面スクロール roll down キー 下に一画面スクロール カーソルキー それぞれのキーに対応する方向に一マススクロール ESCキー セットするユニットの属性(固定/可変)を切り換える 数字キー ファイルのロード、デリート時に目的のファイルに対応する番号を入力 するとき、および、ファイルのセーブ時のファイル名入力時似使用する 文字キー ファイルをセーブするときのファイル名入力時に使用。また、”Y”、 ”N”キーはシステム側の質問に対して答える時にも使用する。”I” ,”J”,”K”,”M”キーは、それぞれの位置に対応する方向に一 画面スクロールする Return キー 通常の処理中に押すと、UNDO機能が働く Space キー ファイルのセーブ、ロード、デリートの処理中は、ファイルのセーブ、 ロード、デリートの実行をする。通常の処理中は、最後に入力したユニ ットの始点のある画面に切り替わる <ユニットをセットする手順> ***固定ユニットのセット*** 1 セットするユニットの属性を,ESCキーで切り換える 2 セットするユニットのNo.を、数字キーで入力する 3 画面上の赤カーソル(始点カーソル)をセットしたい位置に持っていく 4 マウスの右ボタンを押し、ユニットをセットする ***可変ユニットのセット*** 1 セットするユニットの属性を,ESCキーで切り換える 2 セットするユニットのNo.を、数字キーで入力する 3 画面上の赤カーソル(始点カーソル)をセットしたい位置に持っていく 4 マウスの左ボタンを押し、移動するカーソルを緑カーソル(終点カーソル)に変える 5 画面上の緑カーソル(終点カーソル)をセットしたい位置に持っていく 6 マウスの右ボタンを押し、ユニットをセットする ユニットをセットすると、赤カーソル(始点カーソル)が緑カーソル(終点カーソル)の位置に移動する <フロッピーのフォーマット手順> 1 f2キーを押す 2 システムの質問に”Y”、”N”キーで答える。フォーマットする時は”Y”、やめる時 は”N”又はf2キーを押す 3 エラーが出た場合、f2キーを押せば通常の処理に戻れる <ファイルのセーブ手順> 1 f3キーを押す 2 ファイル名を入力。ファイル名は先頭英字、最大8文字の英数字で入力する。 入力はキーボードの文字キーと数字キーで行なう。左カーソルキーで一文字戻り、リター ンキーで先頭まで戻り修正できる。拡張子は自動的に”dat”が付加される 3 f10キーを押し、セーブを実行 4 システムがファイル名に関する質問をするので、”Y”、”N”キーで答える 5 エラーが出た場合、f3キーを押せば通常の処理に戻れる <ファイルのロード手順> 1 f4キーを押す 2 ロードしたいファイルの番号をキーボードの数字キーで入力。 なお、ファイル名一覧は、上下カーソルキーで上下にスクロールする 3 f10キーを押し、ロードを実行 4 f4キーを押して、通常の処理に戻る <ファイルのデリート手順> c || l. 1 f5キーを押す 2 デリートしたいファイルの番号をキーボードの数字キーで入力。 なお、ファイル名一覧は、上下カーソルキーで上下にスクロールする 3 f10キーを押し、デリートを実行 4 f5キーを押して、通常の処理に戻る <画面使用状況一覧での手順> 1 f6キーを押す 2 現在使用されている画面が、全体図の中で青く反転して表示される 3 次に作業したい画面を全体図から矢印カーソルで選び、マウスの右ボタンを押して決定す る。選択された画面は、全体図の中で白くフラッシングする 4 f6キーを押して、通常の処理に戻る <各種パラメータの設定の手順> 1 f7キーを押す 2 フラッシングしている文字を、変更したいパラメータの位置に、上下カーソルで合わせる 3 パラメータを十六進で入力する。入力は数字キーの0~9および文字キーのA~Fで行な う。なお、入力したい数値が一桁であるとき、10の位に0を入力しなければ、1の位を 入力することができない 4 f7キーを押して、通常の処理に戻る |
**************************** * Yoshi's Island BG Tool (ver 1.1) Manual * **************************** <Mouse Button Explanation> Key Name: Key Explanation Right Click: Switch cursor from start to end point when setting variable units. Left Click: Set Unit <Keyboard Explanation> ***Function Key Explanation*** Key Name: Key Explanation F1 Key: Change Work Mode (Normal, Delete, Search Delete, Etc.) F2 Key: Format Floppy F3 Key: Save File F4 Key: Load File F5 Key: Delete File on Floppy F6 Key: Screen Usage Status List F7 Key: Set Various Parameters F8 Key: Scroll 1 Screen Left F9 Key: Screen 1 Screen Right F10 Key: Display All BGs (Backgrounds, Foregrounds) Used in Game When you enter function processing and press a function key corresponding to a particular function, you'll return to normal processing. Additionally, when you press the return key during change processing in work mode, you'll also return to normal processing. ***Other Key Explanations*** Key Name: Key Explanation Roll Up Key: Scroll 1 Screen Up Roll Down Key: Scroll 1 Screen Down Cursor Key: Scroll 1 Square in Direction Corresponding to Respective Key ESC Key: Switch Attributes of Unit Being Set (Fixed/Variable) Number Keys: Use these when inputting a number corresponding to a target file while saving and deleting files, as well as inputting file names when saving files. Letter Keys: Use these when inputting file names while saving files. You also use the Y and N keys to answer system questions. I, J, K, and M scroll one screen in a direction corresponding with their respective positions. Return Key: Press during normal processing to activate the UNDO function. Space Key: Executes file saving, loading, and deleting during file saving, loading, and deleting processing. Switches to screen with the start point of the last input unit during normal processing. <Unit Setting Instructions> ***Set Fixed Unit*** 1: Change the attributes of the unit being set via the ESC key. 2: Input the number of the unit being set via the No. keys. 3: Move the red cursor (start point cursor) at the upper part of the screen to the position at which you want to set a unit. 4: Right click with the mouse to set a unit. ***Set Variable Unit*** 1: Change the attributes of the unit being set via the ESC key. 2: Input the number of the unit being set via the No. keys. 3: Move the red cursor (start point cursor) on the upper part of the screen to the position at which you want to set a unit. 4: Left click with the mouse to change the movement cursor to the green cursor (end point cursor). 5: Move the green cursor (end point cursor) at the upper part of the screen to the position at which you want to set a unit. 6: Right click with the mouse to set a unit. When you set a unit, the red cursor (start point cursor) will move to the position of the green cursor (end point cursor). <Floppy Formatting Instructions> 1: Press the F2 key. 2: Answer the system question via the Y or N key. Press Y to format and N or F2 to cancel. 3: If an error occurs, you can return to normal processing by pressing the F2 key. <File Saving Instructions> 1: Press the F3 key. 2: Input a file name. Input a file name via the alphanumeric keys that begins with an alphanumeric character and is a maximum of 8 alphanumeric characters long. Use the letter and number keys on the keyboard. You can make adjustments by going back one character with the left cursor key and the right cursor keys and returning to the beginning with the Return key. "dat" will automatically be added as an extension. 3: Press the F10 key to save. 4: The system will ask a question related to the file name. Answer with Y or N. 5: If an error occurs, you can return to normal processing via the F3 key. <File Loading Instructions> 1: Press the F4 key. 2: Input the number of the file you want to load via the number keys on the keyboard. Additionally, you can also scroll up and down the file list via the up and down cursor keys. 3: Press the F10 key to load. 4: Press the F4 key to return to normal processing. <File Deleting Instructions> 1: Press the F5 key. 2: Input the number of the file you want to delete via the number keys on the keyboard. You can also scroll up and down the file list via the up and down cursor keys. 3: Press the F10 key to delete. 4: Press the F5 key to return to normal processing. <Screen Usage Status List Instructions> 1: Press the F6 key. 2: The screen currently in use will be inverted and displayed in blue in the full view. 3: Next, select the screen you want to work on from the full view using the arrow cursor, and confirm your decision by right-clicking the mouse. The selected screen will flash white in the overall view. 4: Press the F6 key to return to normal processing. <Instructions for Setting Various Parameters> 1: Press the F7 key. 2: Line up the flashing text character with the position of the parameter you'd like to change via the up and down cursor. 3: Input a parameter in hexadecimal. Use the 0-9 and A-F keys to do this. When the value you want to input is a single digit, you need to put a 0 in the tens column, or you won't be able to put anything in the ones column. 4: Press the F7 key to return to normal processing. |
Note that "Variable Units" are called "Objects" by western Yoshi's Island modders and documenters, while "Fixed Units" are referred to as "Extended Objects".
Development Snapshot
Comparing the assets of this prototype with files that have accurate last-modified dates, it appears that it dates from late 1993.
Entities
- The entities DOROB (the bandit) and BUGGY (an unused four-wheeled buggy) are present in the ROM in the form of code, but they don't have graphics assigned to them. This means that ystool.hex is older than the earliest version of the file that assigns graphics to entities, SFC\ソースデータ\ヨッシーアイランド\日本_Ver0\sfc\back_up\ys_ench.asm.BAK0, as the file does have graphical assignments for these entities.
Meter
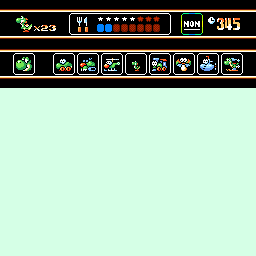
| Prototype | Final |
|---|---|
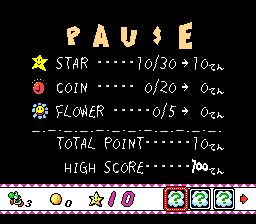
The meter, which appears on the pause screen in the final game, originally contained a hunger gauge. Code related to this meter can still be found in the source by searching for text such as "はらぺこメーター" (Hunger Meter), "eat power", and "eat counter", and the labels MEATPW and MEATCT. The meter was converted to a charging meter indicating how far an egg would be tossed in a later prototype, and removed from the final game entirely.
Icons for all of Yoshi's possible transformations are also present, including the forms of Mini Yoshi and Mushroom Yoshi, which are also absent from the released version.
In the final game, the windows on the meter are for items.
The level countdown timer was also removed, but code that may be associated with it can be found by searching for the labels TIMER and TIMEUP.
Palettes
The common sprite palettes look like this in ystool.
| Prototype | Final |
|---|---|
Palettes: BG1
| Label | Comment | Translation |
|---|---|---|
| BG1COLBK | BG1 Colour Bank | |
| BG1_SUB_7_COL | ;[0:地下] | Underground |
| BG1_SUB_1_COL | ;[1:草] | Grass |
| BG1_SUB_2_COL | ;[2:水中] | Underwater |
| BG1_SUB_3_COL | ;[3:溶岩] | Lava |
| BG1_SUB_6_COL | ;[4:雪] | Snow |
| BG1_SUB_5_COL | ;[5:バブル] | Bubble |
| BG1_SUB_0_COL | ;[6:カベ] | Wall |
Palettes: BG2
| Label | Comment | Translation |
|---|---|---|
| BG2COLBK | BG2 Colour Bank | |
| BG2_SUB_7_COL | ;[0:地下] | Underground |
| BG2_SUB_4_COL | ;[1:草] | Grass |
| BG2_SUB_1_COL | ;[2:水中] | Underwater |
| BG2_SUB_0_COL | ;[3:溶岩] | Lava |
| BG2_SUB_3_COL | ;[4:雪] | Snow |
| BG2_SUB_3_COL | ;[5:バブル] | Bubble |
| BG2_SUB_6_COL | ;[6:カベ] | Wall |
| BG2_SUB_5_COL | ;[7:パステル2] | Pastel 2 |
Palettes: BG3
| Label | Comment | Translation |
|---|---|---|
| BG3COLBK | BG3 Colour Bank | |
| BG3_SUB_0_COL | ;[0:雪山] | Snowy Mountain |
| BG3_SUB_1_COL | ;[1:草トンネルマスク] | Grass Tunnel Mask |
| BG3_SUB_2_COL | ;[2:水中] | Underwater |
| BG3_SUB_3_COL | ;[3:スライム] | Slime |
| BG3_SUB_4_COL | ;[4:カベ] | Wall |
| BG3_SUB_5_COL | ;[5:バブル泡] | Bubble Foam |
| BG3_SUB_6_COL | ;[6] | |
| BG3_SUB_7_COL | ;[7] | |
| BG3_SUB_8_COL | ;[8] | |
| BG3_SUB_9_COL | ;[9] | |
| BG3_SUB_A_COL | ;[A] | |
| BG3_SUB_B_COL | ;[B] | |
| BG3_SUB_C_COL | ;[C] | |
| BG3_SUB_D_COL | ;[D] | |
| BG3_SUB_E_COL | ;[E] | |
| BG3_SUB_F_COL | ;[F] |
Palettes: OBJ
| Label | Comment | Translation |
|---|---|---|
| OBJCOLBK | Object Colour Bank | |
| OBJ_SUB_1_COL | ;[0:地下] | Underground |
| OBJ_SUB_1_COL | ;[1:草] | Grass |
| OBJ_SUB_2_COL | ;[2:水中] | Underwater |
| OBJ_SUB_3_COL | ;[3:溶岩] | Lava |
| OBJ_SUB_6_COL | ;[4:雪] | Snow |
| OBJ_SUB_6_COL | ;[5:バブル] | Bubble |
| OBJ_SUB_0_COL | ;[6:カベ] | Wall |
| OBJ_SUB_1_COL | ;[7:パステル2] | Pastel 2 |
Tilesets
ツール\tool\old_cos\sfc\ys_init.asm assigns graphical banks to the tilesets that existed at this time.
The following graphical banks, despite existing, are empty:
| BG1 | BG2 | BG3 | OBJ |
|---|---|---|---|
CHR05 CHR0B CHR0E CHR0F CHR31 CHR32 CHR33 CHR38 CHR39 CHR3A CHR3B |
CHR1D |
CHR25A CHR25B CHR26A |
CHR42 CHR44 CHR48 CHR4C CHR4D CHR4E CHR4F |
Tileset: BG1
| Japanese | Translation |
|---|---|
BG1CHRBK EQU $ ; [0] [1] [2] BYTE CHR00,CHR01,CHR30 ;[0:地下] BYTE CHR02,CHR03,CHR31 ;[1:草] BYTE CHR08,CHR09,CHR09 ;[2:水中] BYTE CHR0A,CHR0B,CHR0B ;[3:溶岩] BYTE CHR04,CHR05,CHR32 ;[4:雪] BYTE CHR06,CHR07,CHR07 ;[5:バブル] BYTE CHR0C,CHR0D,CHR31 ;[6:カベ] |
BG1 Character Bank Underground Grass Underwater Lava Snow Bubble Wall |
Character Bank 3C:
Tileset: BG2
| Japanese | Translation |
|---|---|
BG2CHRBK EQU $ ; [0] [1] BYTE CHR1E,CHR1F ;[0:地下] BYTE CHR18,CHR19 ;[1:草] BYTE CHR12,CHR13 ;[2:水中] BYTE CHR10,CHR11 ;[3:溶岩] BYTE CHR10,CHR11 ;[4:雪] BYTE CHR14,CHR15 ;[5:バブル] BYTE CHR1C,CHR1D ;[6:カベ] BYTE CHR1A,CHR1B ;[7:パステル2] |
BG2 Character Bank Underground Grass Underwater Lava Snow Bubble Wall Pastel 2 |
Tileset: BG3
| Japanese | Translation |
|---|---|
BG3CHRBK EQU $ ; [0] [1] BYTE CHR20A,CHR20B ;[0:雪山] BYTE CHR22A,CHR21A ;[1:水中(部分スクロール)] BYTE CHR22A,CHR22B ;[2:BG3敵(カベ、オバケetc)] BYTE CHR23A,CHR22B ;[3:パステル] BYTE CHR23A,CHR22B ;[4: ” 2] BYTE CHR24A,CHR24A ;[5:BG3敵(横回転ポリゴン)] BYTE CHR22A,CHR22B ;[6: ” (ボルト)] BYTE CHR22A,CHR22B ;[7:竜巻] BYTE CHR22A,CHR22B ;[8:砂嵐] |
BG3 Character Bank Snowy Mountain Underwater (Partial Scroll) BG3 Enemies (Walls, Ghosts, Etc.) Pastel " 2 BG3 Enemies (Horizontal Rotating Polygons) " (Bolt) Whirlwind Sandstorm |
Tileset: OBJ
| Japanese | Translation |
|---|---|
OBJCHRBK EQU $ ; [0] [1] BYTE CHR42,CHR43 ;[0:地下] BYTE CHR40,CHR4B ;[1:草] BYTE CHR40,CHR49 ;[2:水中] BYTE CHR4A,CHR4B ;[3:溶岩] BYTE CHR40,CHR45 ;[4:雪] BYTE CHR46,CHR47 ;[5:バブル] BYTE CHR4A,CHR4B ;[6:カベ] BYTE CHR40,CHR4B ;[7:パステル2] |
Object Character Bank Underground Grass Underwater Lava Snow Bubble Wall Pastel 2 |
Character Bank 40:
Character Bank 50:
Character Bank 51:
Tileset: SuperFX
Offset 0x70000:
